IntegratorsResource

Projector warping & edge blending · Windows

MORF

Several projectors, one seamless image. MORF corrects each projector's geometry — keystone, lens and curved-screen distortion — and blends the overlaps so the joins disappear.

Version 1.3.1 · Windows 10 and 11, 64-bit

What it does

Line up the picture, then make the seams vanish

Everything you adjust is live on the projectors while you drag.

Geometry warp

Drag four corners to square up a keystoned image, then switch to a mesh of up to 33 × 33 points for lens and screen-shape distortion. Keep aspect ratio fits the picture edge to edge without stretching it.

Curved screens

Double-click exactly where the screen bends to add a point there. Rows and columns follow your points instead of a fixed even grid.

Edge blending

Overlapping light adds up to exactly 100%. Shape the ramp, match the projectors' gamma and balance their brightness against each other.

Auto layout, or a webcam

Set the tiles (2 × 1, 3 × 1, 2 × 2 …) and the overlap for one-click regions — or let a USB webcam measure where every projector lands and lay out and warp them for you.

Test patterns and content

Align against grid and colour-identify patterns, a still image, or a live capture of another monitor — what the audience will actually see.

Set and forget

Projects save as small .morf files. Show mode starts the projectors at sign-in with no editor on screen, and an edit password keeps end users out.
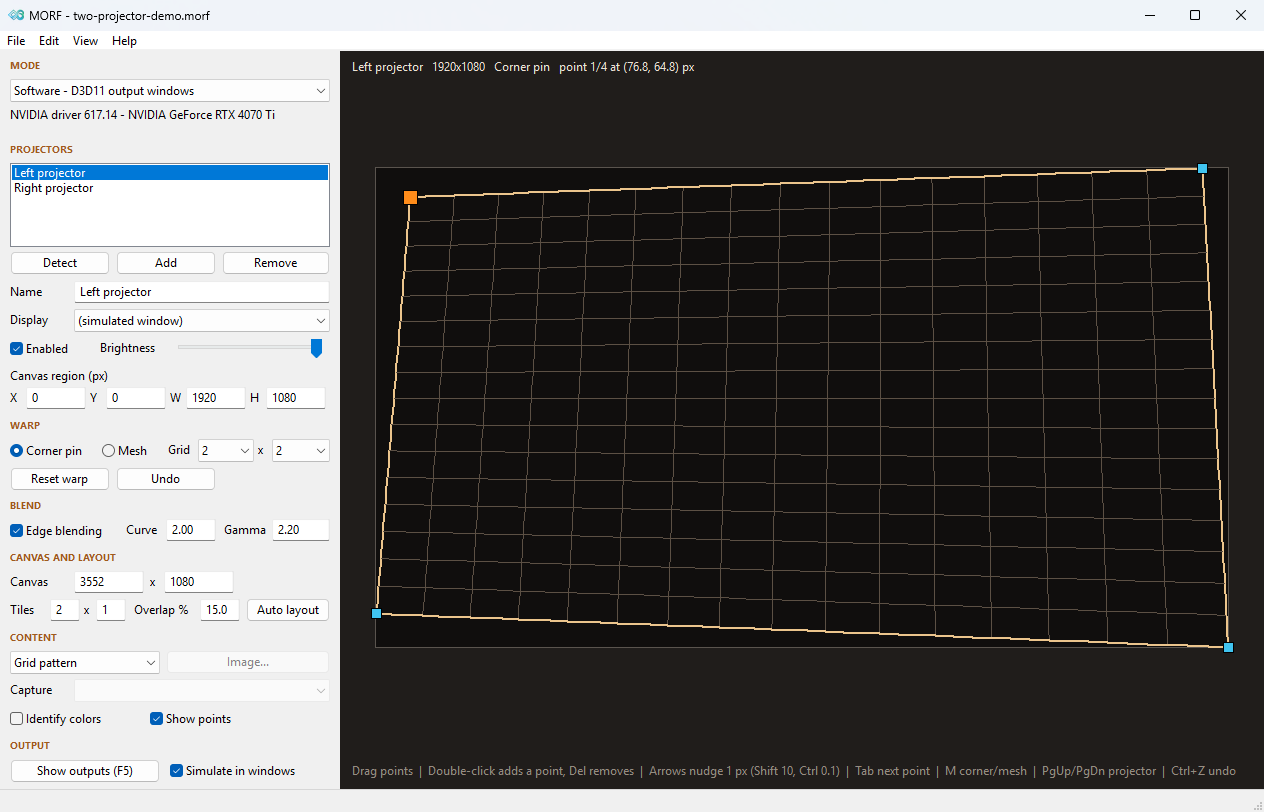
The MORF editor: projector settings on the left, the warp preview of the left projector on the right with its corner-pin points.
The editor with the two-projector demo project: settings on the left, the live warp preview on the right.

How it works

One warp and blend model, two ways to drive it

Hardware

NVIDIA Warp & Blend

MORF hands the warp mesh and blend mask to the GPU through NVAPI. The graphics card corrects the whole Windows desktop at scan-out, so every application — players, media servers, simulators — comes out warped and blended with no extra latency.

Needs an NVIDIA RTX professional or Quadro card; pair it with NVIDIA Mosaic with overlap for blending.

Software

Direct3D 11 output windows

MORF renders the warped, blended image itself in a borderless full-screen window per projector, from a test pattern, an image or a live capture of another monitor.

Works on any Direct3D 11 graphics card, and can simulate the outputs in windows when no projectors are attached.

Requirements

What you need

  • Windows 10 or 11, 64-bit. MORF comes as an installer, MORF-Setup.exe, that puts it in Program Files with a Start menu shortcut.
  • A MORF license for each PC it runs on. Each PC is activated once, online or offline; after that MORF runs without internet.
  • Software mode: any graphics card with Direct3D 11.
  • Hardware mode: an NVIDIA RTX professional (A-series or Ada) or Quadro card. GeForce drivers refuse the Warp & Blend calls, and MORF tells you so before you rely on it.
  • Blending in hardware mode: NVIDIA Mosaic configured with overlap in the NVIDIA Control Panel, so the projectors' content overlaps on the desktop.
  • Camera calibration: a USB webcam (1080p is plenty) that can see the whole screen from where the audience will be.

Getting started

From a blank wall to a seamless picture

These steps use software mode, which works on any graphics card: MORF draws the corrected image itself in a full-screen window on each projector. On an NVIDIA RTX professional or Quadro card you can choose hardware mode instead, and the card corrects the whole Windows desktop.

1 · Set up
  1. Run MORF-Setup.exe, start MORF and enter your license key (see Licensing).
  2. Connect the projectors and set Windows Display settings to Extend, so each projector is its own display.
  3. In MORF set Mode to Software – D3D11 output windows and click Detect. You get one projector per extra display; check each one's Display.
  4. Under Canvas and layout set the Tiles (2 × 1 for two side by side) and the Overlap %, then click Auto layout.
2 · Align
  1. Set Content to Grid pattern, untick Simulate in windows and press F5. Every projector shows a full-screen grid.
  2. In Corner pin, drag the four corners until the grid sits on the screen — in the preview or right on the projected image. Arrow keys nudge 1 px; PgUp / PgDn switch projectors.
  3. Curved screen? Press M for Mesh, double-click where the screen bends to add a point there, and drag until the grid lines run straight.
3 · Blend
  1. Tick Edge blending. Start with Curve 2 and Gamma 2.2, and adjust until the overlap is no brighter than the rest of the picture.
  2. Use Brightness to match the projectors to each other.
4 · Show
  1. Set Content to Capture and choose the monitor your show runs on. MORF mirrors it live through the warp and blend onto the projectors; turn on View › Show mouse pointer to see the pointer in it. Image… shows a still picture instead.
  2. Save the project with Ctrl+S. To start straight into the outputs next time, make a shortcut to MORF.exe --play "C:\Shows\show.morf".

Tip: the capture source must be a monitor that isn't one of the projectors. If the PC has no spare screen, an HDMI dummy plug gives it an invisible one.

Let a webcam line it up

Camera calibration does the layout and warping for you — steps 4, 6 and 7 above. A webcam watches patterns on each projector and MORF works out where every projector pixel lands on the screen, to a fraction of a pixel, so the picture fills the screen and the overlaps line up.

Camera calibration
  1. Set up as in steps 2 and 3: Mode Software, and each projector's Display chosen.
  2. Put a USB webcam where the viewers' eyes will be — for a golf simulator, behind the hitting mat — so the whole screen is in its picture. Dim the room.
  3. Choose Tools › Auto-calibrate with camera and click Start capture. MORF flashes stripes and waves on one projector at a time, about 20–25 seconds each. Keep the camera still and stay out of the light.
  4. MORF outlines the screen in green on the camera picture, with the canvas grid spread over it. Drag any point that isn't on the screen's edge.
  5. Click Apply. Every projector gets its part of the picture and its warp, and the overlaps are set for blending. Everything stays editable, and Ctrl+Z undoes it.

Then set the blend by eye (steps 8 and 9). The picture is fitted to the screen as the camera sees it, so it looks right from where the camera stood — put it where the audience will be.

Run it as a show, and lock the editor

For a PC that just runs the screen: MORF starts straight into the projector outputs, with no editor on screen, and the editor stays behind a password so the people using the room can't change anything.

Show mode
  1. Choose Tools › Edit password and set a password. MORF asks for it before the editor opens. Leave it empty to remove it again.
  2. Save the project: MORF asks whether to start it automatically when Windows starts — choose Start at sign-in. When you sign in, MORF opens only the projector outputs — or, in hardware mode, applies the GPU warp and waits in the background. File › Lock (Ctrl+L) switches to show mode straight away.
  3. In show mode the outputs ignore the keyboard and mouse — Esc and Alt+F4 included — and the mouse pointer is hidden over them unless View › Show mouse pointer is on.
  4. To change something, press Ctrl+Alt+Shift+M or start MORF again from its shortcut, and enter the password. The editor opens over the running show.
  5. Close the editor to lock it again; the show keeps running. File › Exit stops MORF.

Another launcher can start a show with MORF.exe --run "C:\Shows\show.morf". Only one MORF runs at a time. The password is stored only as a salted hash; it keeps end users out, but someone with administrator rights on the PC can still remove it.

Licensing

One license key, one activation per PC

MORF is licensed to integrators and venues. Each license covers a set number of PCs.

  1. Get your license. You receive a license key (MORF-XXXXX-XXXXX-XXXXX-XXXXX) and your own download link for the installer.
  2. Install and activate. Start MORF, enter the key and click Activate online. MORF is ready; it works offline from then on.
  3. No internet on that PC? MORF gives you a request code instead. Paste it on integratorsresource.com/morf/activate from any phone or computer, and paste the license code you get back into MORF.
  4. Moving to another PC? On the old one choose Help › License › Deactivate this PC, which frees its place for the new one. Integrators can also script it: MORF.exe --activate KEY, --deactivate, --license.

Release notes

What changed in each version

Updating keeps your projects, settings and license: run the new installer over the old version.

1.3.1 October 8, 2026

  • Keep aspect ratio (under Warp, for each projector). Fit the warp outline edge to edge on the screen and the picture keeps its proportions inside it, centred with black bars, instead of stretching. A curved screen counts at its full unrolled width.
  • Fixed: the Show outputs / Hide outputs button could show the wrong label after you clicked it.

1.3.0 October 7, 2026

  • An installer. MORF-Setup.exe installs MORF in Program Files with a Start menu shortcut, and later versions install over it.
  • Licensing. MORF asks for a license key the first time it starts on a PC and activates online, or offline with a request code. Help › License shows the license and can deactivate the PC to move it elsewhere.
  • MORF is now published by Integrators Resource: the loading screen, the About box and the file properties.

1.2.3 October 2, 2026

  • When you save a project (File › Save, Save As or Ctrl+S), MORF asks whether to start it automatically when Windows starts. Start at sign-in adds a shortcut to your Startup folder that opens the project in show mode.

1.2.2 October 2, 2026

  • A cleaner loading screen, and MORF's windows show its icon at its real sizes, so it is sharp in the title bar, the taskbar and Alt+Tab.

1.2.1 October 2, 2026

  • View › Show mouse pointer, saved with the project: with Capture content the captured monitor's pointer is drawn into the projected picture, warped and blended with it, and the pointer stays visible over the projectors — in show mode too.

1.2.0 October 2, 2026

  • Camera calibration (Tools › Auto-calibrate with camera): a USB webcam measures every projector and MORF lays them out, warps them and lines up the overlaps for you.
  • Show mode for autostart, and an edit password that keeps end users out of the editor.

1.1.0 October 2, 2026

  • Curved screens: double-click anywhere on the image to add a mesh point exactly there; Del removes it.
  • A loading screen while MORF starts, and the version in the About box and MORF.exe --version.

1.0.0 September 29, 2026

  • First release: geometry warping with a corner pin and a mesh of up to 33 × 33 points, edge blending, NVIDIA Warp & Blend (hardware) and Direct3D 11 (software) output, and .morf project files.